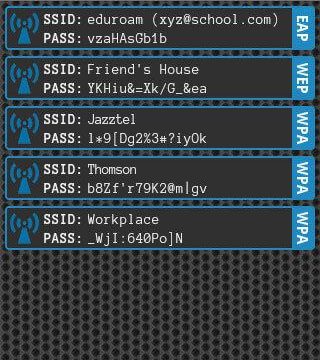
Ever needed to transfer all your saved WiFi passwords to a new computer or just keep a backup? This tutorial is for anyone who’s tired of digging through network settings one by one. By the end, you’ll have a single CSV file listing every network name (SSID) and its password. Whether you’re on Windows or macOS, I’ll show you the quickest command-line tricks. No extra software needed, just a few commands and you’re done.
If you’ve ever had to recover a forgotten password or set up a new device, you know how valuable a password backup is. With a CSV file, you can open it in Excel, transfer it to your phone, or simply print it out. Plus, it’s a great way to audit your home or office networks. Let’s jump in.
What You’ll Need
- A Windows PC or a Mac
- Administrator access (to run commands)
- A text editor (like Notepad or TextEdit) to save the script
- Basic comfort with the command line (I’ll hold your hand!)
- Optional: A USB drive or cloud storage to transfer the CSV
Step 1: Open Command Prompt as Administrator (Windows)
On Windows, we’ll use the netsh command, and it needs admin rights. Click the Start button, type ‘cmd’, right-click on ‘Command Prompt’, and choose ‘Run as administrator’. Click ‘Yes’ when the UAC prompt appears. A black window will pop up—that’s your command prompt.

Step 2: Export WiFi Profiles to a Single File (Windows)
First, we’ll export all WiFi profiles to an XML file. Run this command: netsh wlan export profile key=clear. The ‘key=clear’ part tells it to include the password in plaintext. You’ll see a bunch of XML files appear in your current directory—one per network. That’s step one done.

Step 3: Extract and Format into CSV (Windows)
Now we need to pull just the SSID and password from those XML files. We’ll use a simple PowerShell script. Open Notepad and paste this:
Save it as ‘ExportWifi.ps1’. Then in your command prompt, run powershell -ExecutionPolicy Bypass -File ExportWifi.ps1. When it’s done, you’ll see a file called ‘WiFiPasswords.csv’ in the same folder. Open it with Excel or Notepad to verify.

Step 4: Export WiFi Passwords on macOS
On a Mac, we’ll use the ‘security’ command in Terminal. Open Terminal from Applications > Utilities. First, let’s view all saved network names with: security find-generic-password -wa "YourNetworkName". But doing that one by one is tedious. Instead, we’ll write a script to loop through all known networks.

Step 5: Write a Script to Export All (macOS)
Run this command in Terminal to get a list of saved WiFi networks: networksetup -listpreferredwirelessnetworks en0 (replace en0 with your interface, usually en0 or en1). Copy that list. Then create a script: open a text editor, paste the following, and save as ‘export-wifi.sh’:
Back in Terminal, make the script executable: chmod +x export-wifi.sh, then run it with ./export-wifi.sh. It’ll generate ‘WiFiPasswords.csv’ in your home folder. Open it to see your networks and passwords.

Common Pitfalls
- **Windows: No profiles exported** – Make sure you ran the command as administrator and are in a directory you can write to (like your Desktop).
- **Mac: ‘Not found’ for many networks** – The security command sometimes fails if the password isn‘t saved in the login keychain. Try unlocking your default keychain first with
security unlock-keychain. - **CSV file is empty** – Ensure the script ran without errors. On Windows, check that the XML files exist; on Mac, verify that the ‘networksetup’ list returns results and that your wireless interface name is correct (use ‘ifconfig’ to find the right one).
Where to Next
Now that you have your WiFi passwords in a CSV, you might also want to learn how to view saved wifi password using powershell for a one-off password, or check out our beginner wifi password recovery tutorial if you need to recover passwords on other devices. For more advanced recovery, see our guide on how to recover wifi password after reinstall or recover wifi password on desktop. And if you’re on Linux, don’t miss how to find saved wifi password linux.