Ever had that moment where a friend asks for your WiFi password and your mind goes blank? Or you just set up a new device and need that password you haven’t typed in years? Don’t worry — your desktop already has it saved. This guide is for anyone who uses a Windows PC or Mac desktop and has connected to the network before. By the end, you’ll have your WiFi password back in plain text, no third‑party tools needed. We’ll cover the built‑in methods for both operating systems, plus a sneak peek at the router method if all else fails.
Recovering a WiFi password is super easy and completely legit — you’re just digging it out of your own computer. Whether you’re using Windows 10/11 or macOS Ventura or newer, these steps work. Let’s get that password.
What You’ll Need
- A desktop computer (Windows 8, 10, or 11 / macOS Sierra or later)
- The WiFi network must have been connected to at least once
- Administrator or admin rights on the computer (you usually have these as the main user)
- Optional: Router admin password (printed on a sticker on the router) if you go the router route
Step 1: Recover WiFi Password on Windows (Using Network Settings)
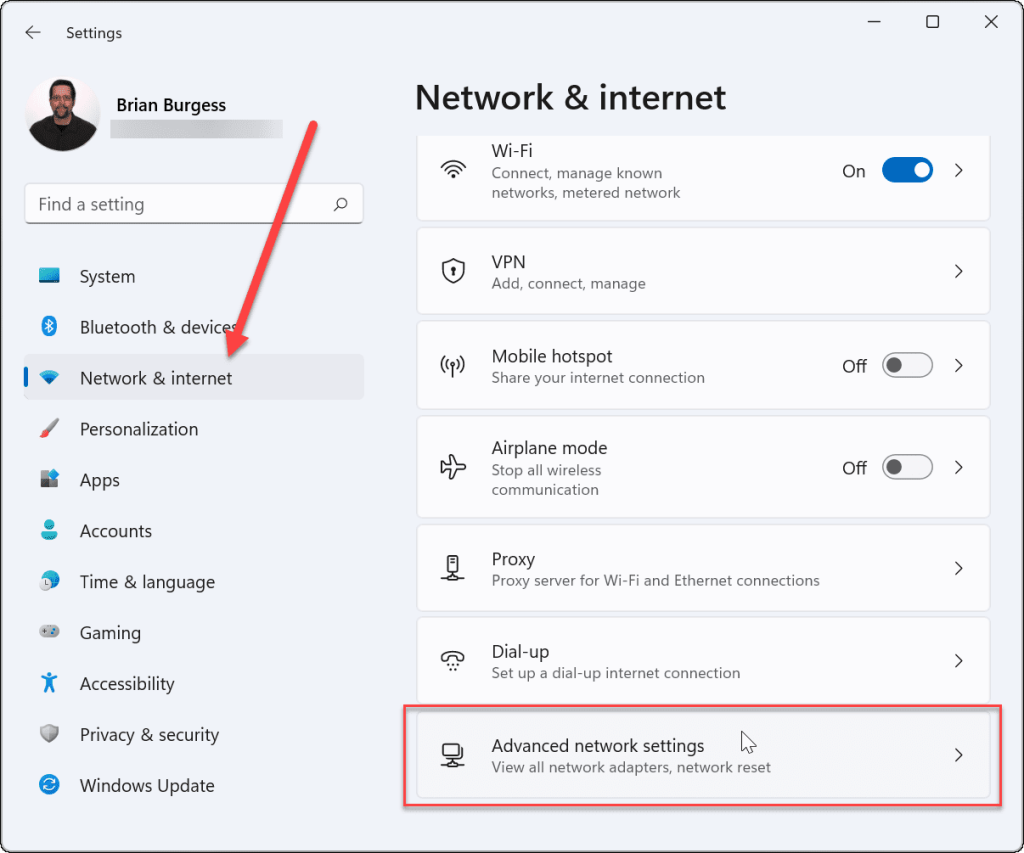
This is the easiest method. Right‑click the WiFi icon in your system tray (the network bars at the bottom right) and select Open Network & Internet settings. Then click Advanced network settings and under Related settings, choose More network adapter options. A window called Network Connections will pop up. Right‑click your active WiFi adapter (usually named Wi‑Fi) and select Status. In the Wi‑Fi Status window, click Wireless Properties. Go to the Security tab and check the box that says Show characters. Your WiFi password will appear in the Network security key field. That’s it!
On older Windows 10 versions the path is slightly different: go to Settings > Network & Internet > Status > Network and Sharing Center > click on your WiFi network name > Wireless Properties > Security > Show characters. Both work.
Step 2: Recover WiFi Password on Windows Using Command Prompt (CMD)

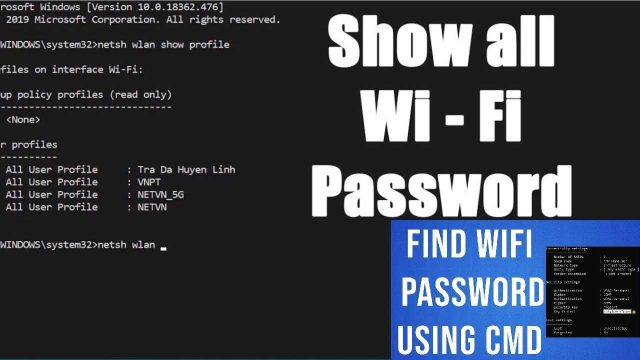
If you prefer the command line or can’t find the settings, use CMD. Press Windows key + X and select Windows Terminal (Admin) or Command Prompt (Admin). Type the following command and hit Enter: netsh wlan show profiles. This lists all saved networks. Find the network name (SSID) you need. Then type: netsh wlan show profile name="YourNetworkName" key=clear (replace YourNetworkName with the actual SSID). Scroll down to Security settings and look for Key Content — that’s your WiFi password. This is a classic WiFi password recovery using CMD trick that never gets old.
Pro tip: You can also export all profiles at once using netsh wlan export profile folder=C: key=clear. That’s one of the advanced WiFi password recovery methods covered in more detail elsewhere.
Step 3: Recover WiFi Password on macOS Using Keychain Access
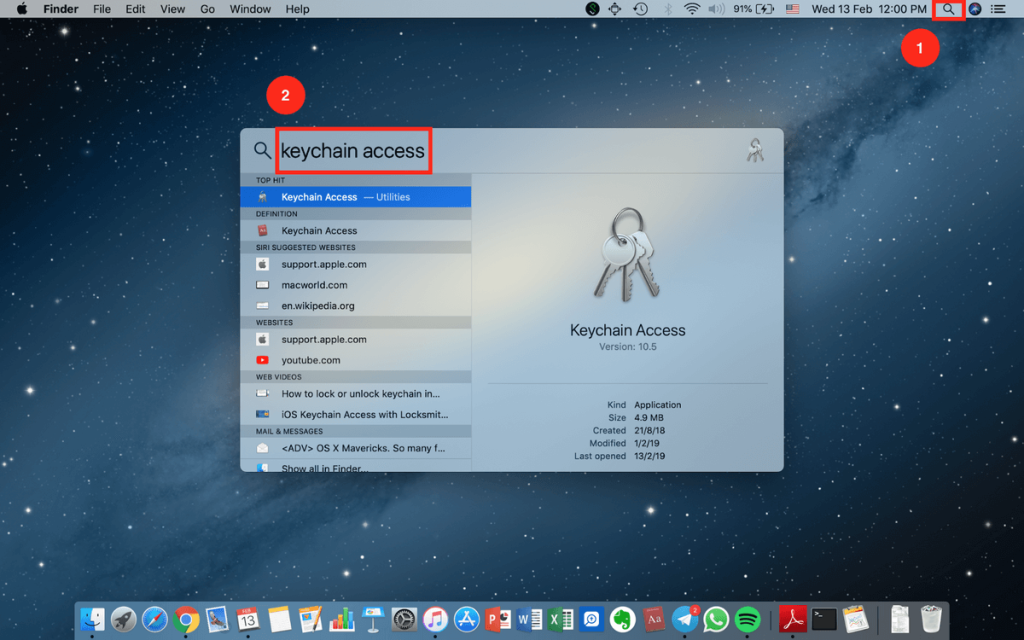
On a Mac, open Keychain Access (you can find it via Spotlight by pressing Cmd+Space and typing “Keychain Access”). In the search bar at the top right, type the name of your WiFi network. Double‑click the entry that appears (it will be under the kind “AirPort network password”). A window pops up. Check the box Show password. You’ll be prompted for your Mac’s admin username and password (the one you use to log in). Enter it and click Allow. Your WiFi password will appear in the field. This is the fastest WiFi password recovery via Keychain method.
Step 4: Recover WiFi Password from Your Router (If All Else Fails)

If you can’t access the password from your computer (maybe you’re on a work device with restrictions), you can go straight to the router. Open a web browser and enter your router’s IP address (usually 192.168.0.1 or 192.168.1.1 — check the sticker on the router). Log in with the admin username and password (often “admin” / “admin” or printed on the sticker). Look for a section like Wireless or Wi‑Fi Settings. There you’ll see the password (sometimes called Pre‑Shared Key or Security Key). This is a solid WiFi password recovery from laptop method that works even if you’ve never connected before. For brand‑specific steps, check our guide on WiFi password recovery for TP‑Link or Asus routers.
Common Pitfalls
- No admin rights: If you’re using a corporate or school computer, you might not be able to see the password in Network Settings or CMD. In that case, the router method is your best bet — but be careful: changing router settings without permission could get you in trouble.
- Wrong network name: When using CMD or Keychain, make sure you’re looking at the correct SSID. Networks with similar names (e.g., “Home 5G” vs “Home 2.4G”) can confuse you. Double‑check the exact name before copying.
- Forgot router admin password: If you can’t log into the router, you can reset it by holding the reset button on the back for 10 seconds. But that will erase all custom settings (including your WiFi password), so you’ll have to set it up again. Always try the desktop methods first.
Where to Next
Now that you’ve recovered your password, maybe you want to keep it safe? Check out how to backup WiFi passwords automatically so you never lose them again. Or if you’re a student on a university network, we have a guide for university WiFi password recovery that covers those captive portals. For a bullet‑proof approach that works everywhere, our secure WiFi password recovery process walks you through best practices. And if you ever need to recover passwords on the go, don’t miss the method to find saved WiFi password from registry — it’s another powerful trick.
Happy recovering — you’ve got this!