Ever been in that awkward spot where you need to connect a new device to your WiFi, but nobody remembers the password? It’s written on the router sticker, but that thing’s buried behind the couch. Before you even think about resetting the router and reconfiguring everything, here’s some good news: your computer already knows the password. It has to, otherwise it couldn’t stay connected. In this guide, I’ll show you how to dig that saved WiFi password out of your computer’s network settings on both Windows and macOS. No extra software, no admin wizardry — just the tools already built into your operating system.
By the end of this tutorial, you’ll have your WiFi password in plain text, ready to type or share. I’ll cover Windows 10, Windows 11, and macOS (Ventura and later). If you’re on older versions, the steps are similar but menus might look a bit different. This is truly the easiest WiFi password recovery method — you don’t need to download anything or log into your router. Let’s get started.
What You’ll Need
- A Windows PC (Windows 10 or 11) or a Mac (macOS Ventura or newer)
- Your user account must have administrative privileges (to access network settings)
- The computer must be currently connected to the WiFi network (or have connected to it before)
- Patience for about 5 minutes
Step 1: Open Network Settings on Windows
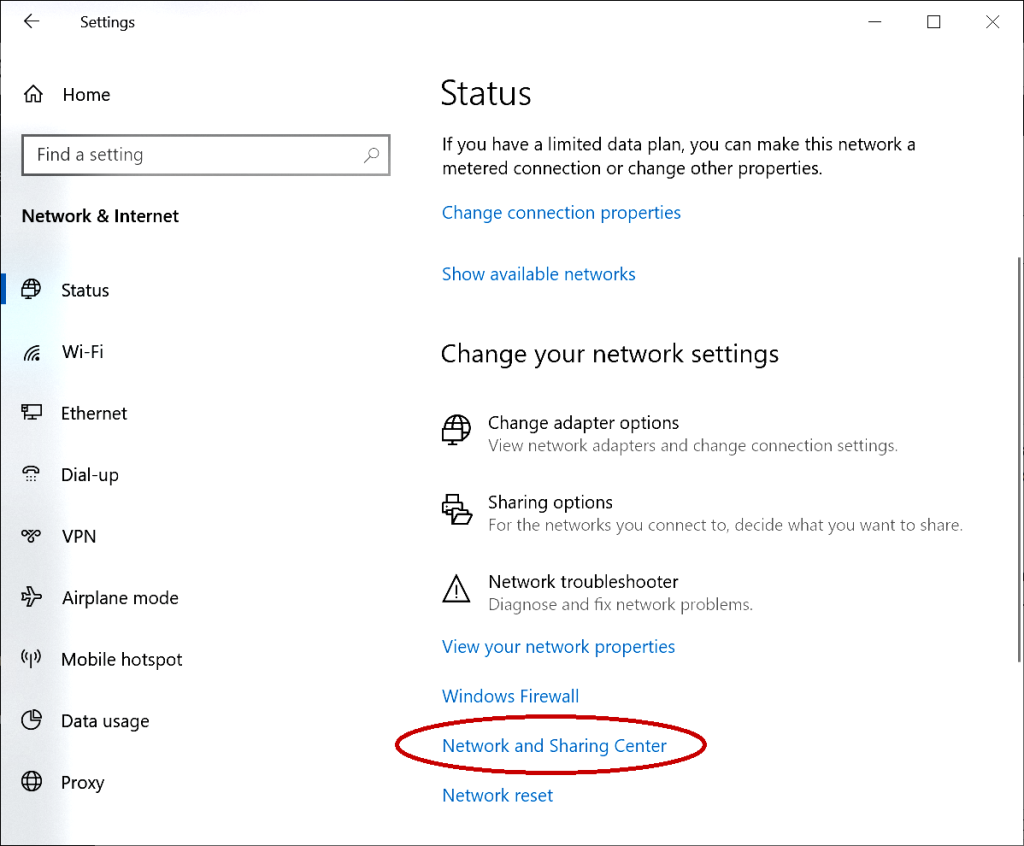
On Windows, the quickest way to find your saved WiFi password is through the Control Panel or the Settings app. I’ll show you both, but the Control Panel method works on all versions. Click the Start button, type “Control Panel” and hit Enter. Then navigate to “Network and Internet” > “Network and Sharing Center.” Alternatively, right-click the WiFi icon in the system tray and select “Network & Internet settings,” then scroll down and click “Network and Sharing Center.”
Step 2: Find Your WiFi Network
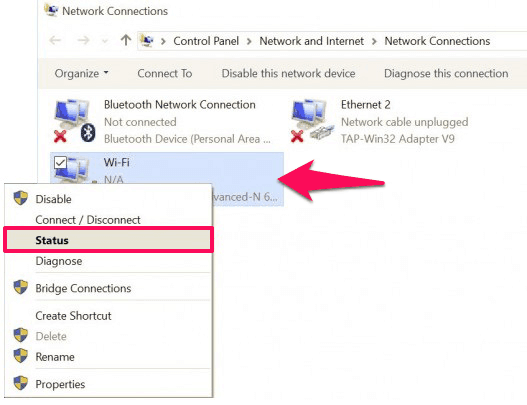
In the Network and Sharing Center, you’ll see a list of active networks. Look for your WiFi network name (SSID) next to “Connections.” Click on the blue link that says something like “WiFi (YourNetworkName).” A small “WiFi Status” window will pop up. Click the “Wireless Properties” button.
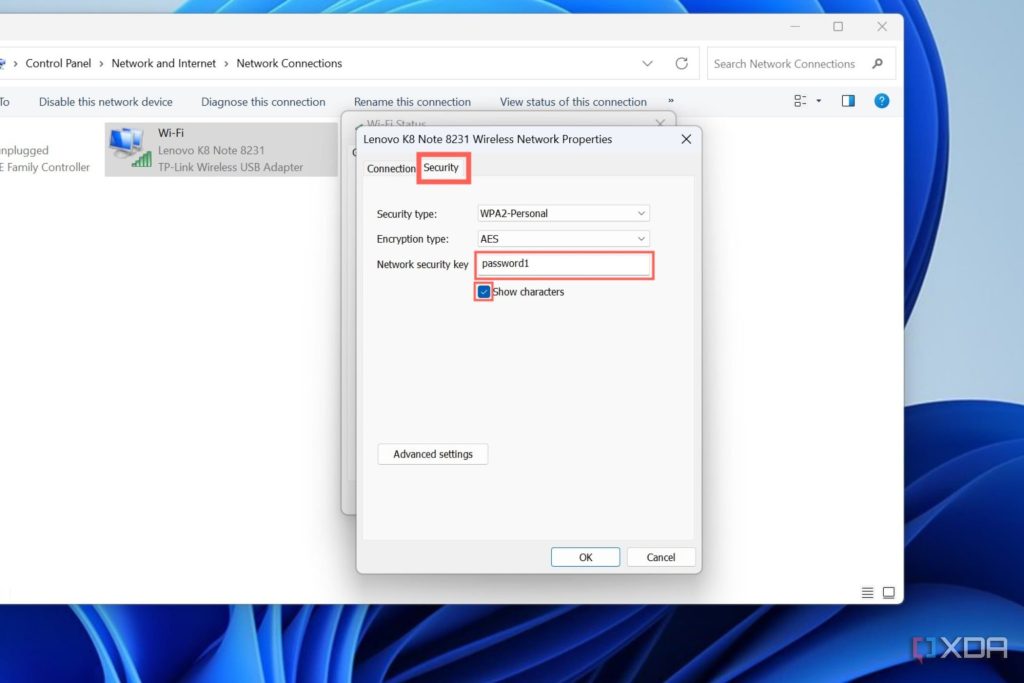
Step 3: Reveal the Password
In the Wireless Network Properties window, switch to the “Security” tab. You’ll see a field labeled “Network security key” with dots hiding your password. Check the box that says “Show characters.” That’s it — your WiFi password is now visible in plain text. Write it down or take a photo. If you’re using Windows 11, the steps are identical; for more details, see our dedicated wifi password recovery tutorial windows 11.
Step 4: Recover WiFi Password on macOS
On a Mac, saved WiFi passwords are stored in the Keychain Access app. Open Finder, go to “Applications” > “Utilities,” then double-click “Keychain Access.” Alternatively, press Cmd+Space, type “Keychain Access,” and hit Enter. In the search bar at the top-right, type your WiFi network name. You’ll see an entry under “System” keychain (usually with a small lock icon).
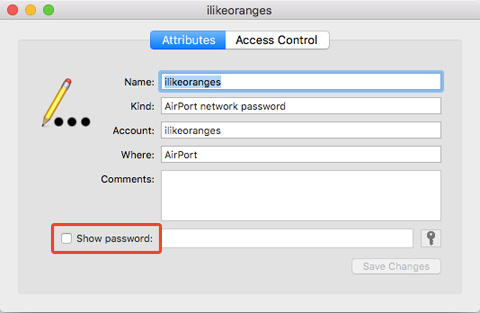
Step 5: Show the Password in Keychain
Double-click the WiFi network entry. A dialog box will appear. Check the box next to “Show password.” It will ask for your Mac’s administrator username and password. Enter your Mac login credentials (the same you use to log in). After that, the password will appear in the field. Copy it or write it down. Note: If you’re using an older macOS version (Mojave or earlier), the interface might look slightly different, but the process is essentially the same.
Step 6: Alternative Method Using Command Line (Windows)
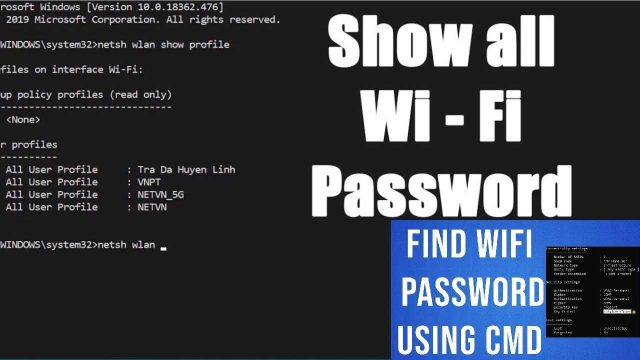
If you prefer the command line or need to recover multiple passwords quickly, you can use PowerShell. Open PowerShell as Administrator (right-click Start and choose “Windows PowerShell (Admin)”). Then run this command: netsh wlan show profile name="YourNetworkName" key=clear. Replace “YourNetworkName” with your actual WiFi SSID. Look for the line “Key Content” — that’s your password. This method is especially handy for batch exports; check out our guide on show wifi password powershell for more advanced usage.
Common Pitfalls
- You’re not an administrator: Both Windows and macOS require admin rights to view saved passwords. If you’re on a work or school computer, you may not have permission. In that case, you’ll need to ask your IT department or use the easiest WiFi password recovery method mentioned earlier.
- Wrong network name: Double-clicking the wrong Keychain entry or looking at a different profile in Windows can yield nothing. Make sure the network you’re checking is the one you’re actually connected to.
- Password field is blank: On macOS, if the password field stays blank even after checking “Show password,” it means you haven’t authenticated properly. Re-enter your admin credentials or try unlocking the Keychain first. For more issues, refer to our wifi password recovery troubleshooting guide.
Where to Next
Now you’ve got your WiFi password back without any hassle. If you want to avoid this situation in the future, consider saving the password in a password manager or writing it down somewhere safe. For more advanced recovery scenarios—like after a BIOS update, on a repeater, or recovering a ZTE router’s password—browse our other guides. And remember, if you ever need to recover forgotten wifi password without reset, the network settings method is your first and best bet.
If you found this helpful, share it with friends who always bug you for the WiFi code. Happy connecting!