Ever needed to connect a new device to your Wi-Fi but couldn’t remember the password? If you’re on a Windows PC that already has that network saved, you’re in luck. Windows stores Wi-Fi passwords locally, and recovering them is quick and easy—no extra software required. In this guide, I’ll walk you through the exact steps to find saved WiFi password on your laptop using built-in Windows tools. By the end, you’ll have the password copied and ready to share.
This method works on Windows 10 and Windows 11, and even on older versions like Windows 8 and 7 with slight variations. We’ll use the classic Network and Sharing Center, so you don’t need to be a tech wizard. Let’s dive in.
What You’ll Need
- A Windows 10 or 11 computer (Windows 7/8 steps are similar)
- The Wi-Fi network must have been connected before (the password is saved in your profile)
- Administrator access (optional but recommended; without it, you can still try the “show WiFi password using PowerShell” method)
Step 1: Open Settings and Go to Network & Internet
Click the Start button (the Windows icon) and then the gear icon to open Settings. Alternatively, press the keyboard shortcut Windows + I. Once in Settings, select Network & Internet (on Windows 11 it’s labeled “Network & internet”). You should land on the Status page by default.

Step 2: Open Network and Sharing Center
Scroll down the Status page until you see the Advanced network settings section. Click on Network and Sharing Center (on Windows 11 it may be under “Related settings”). This opens a classic Control Panel window that lists your active networks.

Step 3: View Your Active Wi-Fi Network
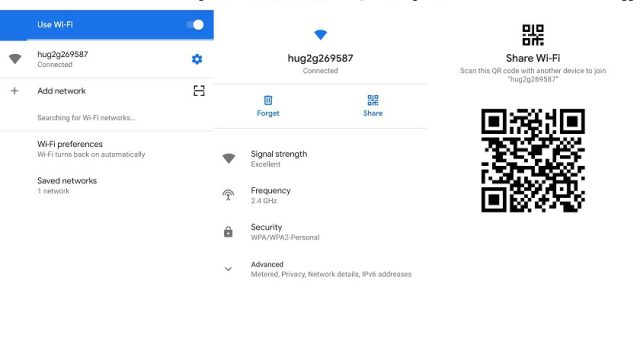
In the Network and Sharing Center, look for the section that says View your active networks. Next to Connections, you’ll see your Wi-Fi network name (e.g., “HomeWiFi”). Click on that network name. A small dialog called Wi-Fi Status will appear.

Step 4: Show the Password
In the Wi-Fi Status window, click the Wireless Properties button. Then switch to the Security tab. You’ll see a field labeled Network security key with dots hiding the password. Check the box that says Show characters. Your Wi-Fi password will appear in plain text. You can now write it down or copy it.

Common Pitfalls
- “Show characters” is grayed out – This usually means you don’t have administrator privileges. Try the method to show WiFi password using PowerShell, which may work without admin rights.
- Network not listed in Network and Sharing Center – Make sure you are connected to the Wi-Fi network or that it is saved under “Manage known networks” in Settings. If not, you’ll need to reconnect first.
- Using Windows 7 or 8 – The steps are almost identical but the menu layout differs slightly. Check our dedicated guide for WiFi password recovery on Windows 7.
Where to Next
Now that you’ve recovered your password, you can connect any device. If you need to recover a password that was never connected to your PC, check our guide on how to recover your WiFi password. And if you’re managing multiple networks, consider building your own WiFi password recovery toolkit for easy access later.