Ever needed to grab a WiFi password from your own PC but couldn’t find it? Maybe you got a new device, or a friend asked for the network key. If you’re on Windows and comfortable with a few keyboard commands, PowerShell is your best friend. This guide will turn you into a WiFi password recovery ninja — by the end, you’ll have a script that dumps every saved WiFi password on your machine instantly.
No extra software, no sketchy downloads. Just pure PowerShell magic. We’ll start with the manual way and then automate the whole process so you can run it with one click. Whether you need one password or all of them, this approach works on Windows 10 and 11. Let’s dive in.
What You’ll Need
- A Windows PC (10 or 11) with at least one saved WiFi network
- Administrator privileges (you’ll need to run PowerShell as admin)
- Basic familiarity with copy-pasting commands
- Optional: a text editor like Notepad to save your script
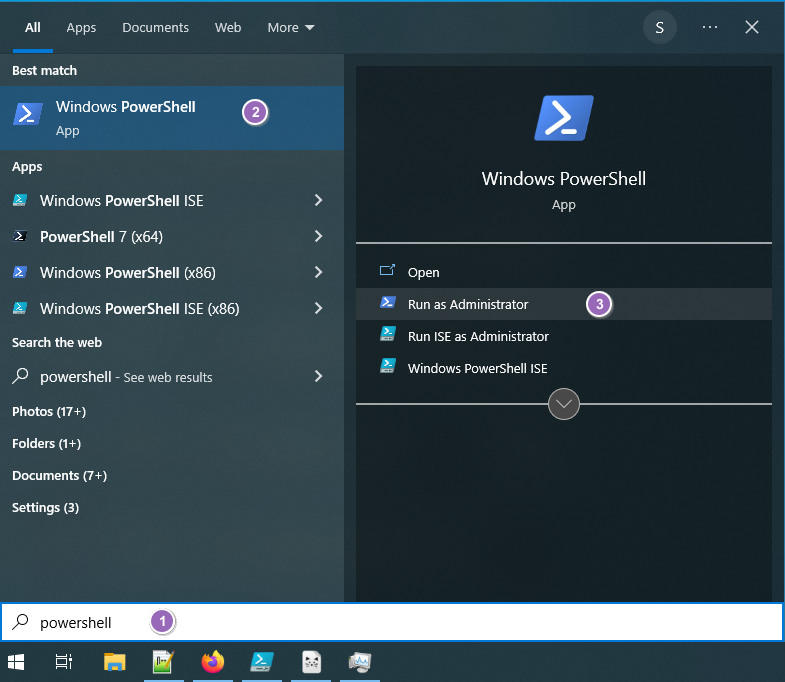
Step 1: Open PowerShell as Administrator
Click the Start button, type ‘PowerShell’, right-click on ‘Windows PowerShell’ and select ‘Run as administrator’. Yes, you need admin rights – the WiFi profiles are stored in a protected location. Accept the UAC prompt if it shows up.
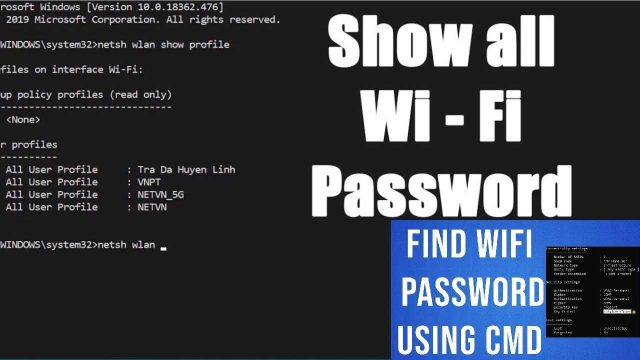
Step 2: List All Saved WiFi Profiles
In the PowerShell window, type this command and hit Enter: netsh wlan show profiles. You’ll see a list of every WiFi network your PC has ever connected to. Note the exact profile names – they’re case-sensitive.

Step 3: View a Single WiFi Password
To see the password for a specific network, use: netsh wlan show profile name="YourNetworkName" key=clear. Replace ‘YourNetworkName’ with the actual SSID. Look for the ‘Key Content’ line – that’s your password. For example, if my network is ‘CoffeeShop’, I’d type netsh wlan show profile name="CoffeeShop" key=clear.

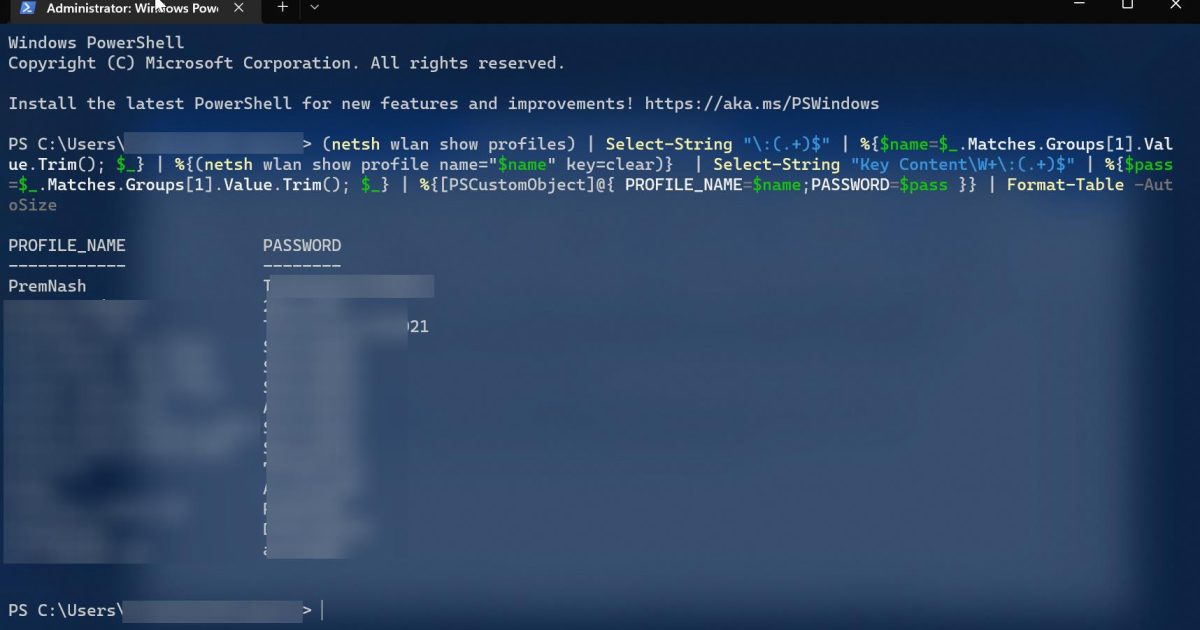
Step 4: Export All Passwords to a File (Manual Loop)
Don’t want to type each name separately? Use this one-liner to save all profiles and passwords to a text file on your desktop:
After running, open the file ‘WiFiPasswords.txt’ on your desktop – every network and its password is neatly listed.

Step 5: Create a One-Click PowerShell Script
Turn the command into a reusable script. Open Notepad, paste the command from Step 4, and save the file as ‘GetWiFiPasswords.ps1’ (make sure the extension is .ps1, not .txt). Now you can run it anytime by right-clicking the file and selecting ‘Run with PowerShell’. For extra convenience, you can create a shortcut that runs as admin.

Common Pitfalls
- Not running PowerShell as admin – commands will fail with ‘Access denied’. Always launch with admin rights.
- Spaces or special characters in SSID names – the command requires quotes around the name. If you forget, you’ll get an error. Use double quotes and escape any internal quotes if needed.
- No saved profiles – if you’ve never connected to a WiFi on this PC, the list will be empty. This method only works for networks your PC has connected to before.
Where to Next
Now you’ve automated WiFi password recovery with PowerShell! You might also explore the simplest wifi password recovery method using the command prompt, or check out our wifi password recovery tricks for alternative approaches. If you need to move your passwords to another computer, our guide on how to backup wifi passwords to usb has you covered. For more context, see our in-depth wifi password recovery tutorial covering all Windows methods, or dive into wifi password recovery via registry for another powerful technique.